
F1M24 Setups Guide
These settings are just a starting point. Each driver may like the setup differently. Don’t expect to use a 97% setup from the list and get the same result for your driver. You’ll need to adjust it to reach the same or better percentage.
If you don’t want to do that, you can use these setups in FP1 and then let the AI run the other practice sessions. This can improve the setup, but the changes might be small.
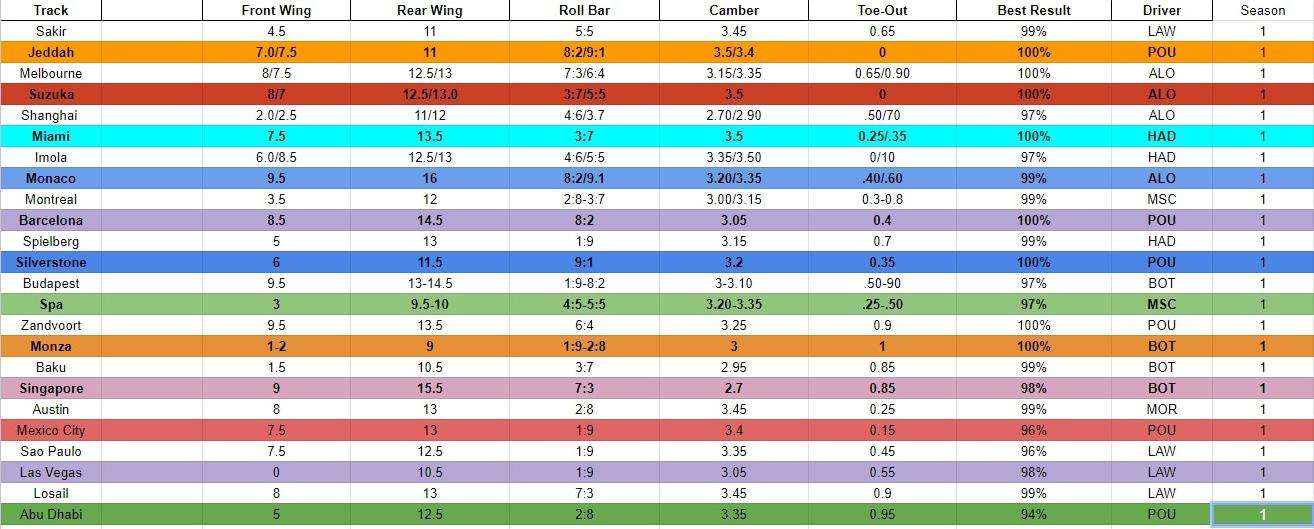
Setups
| Track | Front Wing | Rear Wing | Roll Bar | Camber | Toe-Out | Best Result | Driver |
|---|---|---|---|---|---|---|---|
| Sakir | 4.5 | 11 | 5.5 | 3.45 | 0.65 | 99% | LAW |
| Jeddah | 7.0/7.5 | 11 | 8:2/9:1 | 3.5/3.4 | 0 | 100% | POU |
| Melbourne | 8/7.5 | 12.5/13 | 7:3/6:4 | 3.15/3.35 | 0.65/0.90 | 100% | ALO |
| Suzuka | 8/7 | 12.5/13 | 3:7/5:5 | 3.5 | 0 | 100% | ALO |
| Shanghai | 2.0/2.5 | 11/12 | 4:6/3:7 | 2.70/2.90 | .50/70 | 97% | ALO |
| Miami | 7.5 | 13.5 | 3:7 | 3.5 | 0.25/.35 | 100% | HAD |
| Imola | 6.0/8.5 | 12.5/13 | 4:6/5:5 | 3.35/3.50 | 0/10 | 97% | HAD |
| Monaco | 9.5 | 16 | 8:2/9:1 | 3.20/3.35 | .40/.60 | 99% | ALO |
| Montreal | 3.5 | 12 | 2:8-3:7 | 3.00/3.15 | 0.3-0.8 | 99% | MSC |
| Barcelona | 8.5 | 14.5 | 8:2 | 3.05 | 0.4 | 100% | POU |
| Spielberg | 5 | 13 | 1:9 | 3.15 | 0.7 | 99% | HAD |
| Silverstone | 6 | 11.5 | 9:1 | 3.2 | 0.35 | 100% | POU |
| Budapest | 9.5 | 13-14.5 | 1:9-8:2 | 3-3.10 | .50-90 | 97% | BOT |
| Spa | 3 | 9.5-10 | 4:5-5:5 | 3.20-3.35 | .25-.50 | 97% | MSC |
| Zandvoort | 9.5 | 13.5 | 6:4 | 3.25 | 0.9 | 100% | POU |
| Monza | 1-2 | 9 | 1:9-2:8 | 3 | 1 | 100% | BOT |
| Baku | 1.5 | 10.5 | 3:7 | 2.95 | 0.85 | 99% | BOT |
| Singapore | 9 | 15.5 | 7:3 | 2.7 | 0.85 | 98% | BOT |
| Austin | 8 | 13 | 2:8 | 3.45 | 0.25 | 99% | MOR |
| Mexico City | 7.5 | 13 | 1:9 | 3.4 | 0.15 | 96% | POU |
| Sao Paulo | 7.5 | 12.5 | 1:9 | 3.35 | 0.45 | 96% | LAW |
| Las Vegas | 0 | 10.5 | 1:9 | 3.05 | 0.55 | 98% | LAW |
| Losail | 8 | 13 | 7:3 | 3.45 | 0.9 | 99% | LAW |
| Abu Dhabi | 5 | 12.5 | 2:8 | 3.35 | 0.95 | 94% | POU |
Cheat Sheet
You can also save the table as a picture.
Click to enlarge…
FAQ
How to make DRS Effectiveness 100%?
While very challenging, the best way to achieve this is by having staff with the highest possible ratings for everything, including a Technical Chief with 100 in rear wing design, a Head of Aerodynamics with 100 in DRS effectiveness, a level 5 Design Center, and by far the hardest part – having 100% expertise in DRS effectiveness for both chassis and rear wing. However, it honestly isn’t worth it, as regulation changes can break this setup. Additionally, you would have to heavily focus your DRS effectiveness stat to the point where your other more valuable stats, like all the cornering stats, will be too low.
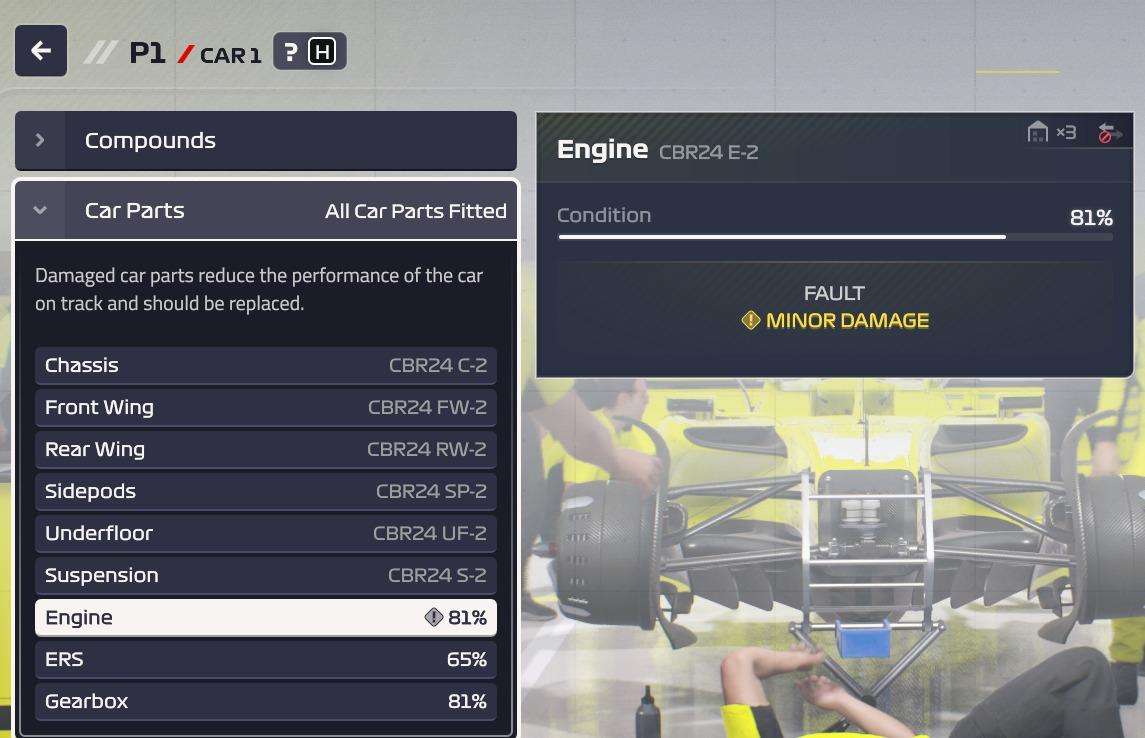
Condition 81% but a faulty engine? Is it a bug?
It’s one of the game functions; mechanical faults can happen sometimes, seemingly at random. This is not a bug.
What is the cost cap?
You get $139.2M for the whole season. This money needs to cover:
- Building and improving the car – includes designing new parts, testing them, and making them
- People’s pay – mechanics, engineers, and talent scouts all count
- Building costs – anything related to making the car better, including your race simulator and weather station
- Extra engine parts if you need them
If you spend more than $139.2M, you’ll have to pay back whatever extra you spent each month as a penalty. Think of it like having a set amount of money to run your whole team. You need to be smart about what you spend it on, since going over means paying fines.
What is the difference between hard mode and standard for race and development?
Race:
- Standard – The AI generally only pushes its fuel and tires hard during “battle mode,” which occurs in the first couple of laps after start/restart, SC, VSC, or when within 1 second of another car in front or behind.
- Hard – The AI is significantly more likely to push its fuel and tires when not in “battle mode.” It will run its tires and fuel to the calculated limit, but it sometimes miscalculates and needs an extra pit stop.
Overall difference – In general, Hard AI provides more difficult tactical battles in races, while Standard AI presents more difficult strategic battles. This varies by track and driver/car tire preservation values. Hard AI handles high driver/car tire values better at lower degradation tracks.
Dev Rate:
- Standard – AI gains car values at the same rate as the player.
- Hard – AI gains car values at 120% of the player’s rate. In “like for like” development, if you replicate their approach, they will always out-develop you. The rate is the only difference; behavior remains unchanged.
Рow do you make teammates protect each other?
Have one car on full defense to block competitors, and have them harass the competition whenever they overtake – for example, even if it means burning fuel and tires beyond reason. Or have one car run ahead deploying ERS + attack mode, with your other driver in DRS range saving fuel and battery. Switch positions whenever the leading car’s battery is drained.
What tyre combinations to use in P1, P2 and P3?
Depends a lot on the race’s needs, and you have to take the mandatory Pirelli returns into account. If I don’t need more than one Hard tire for the race, I do all of FP1 on one set of Hards. Then usually one Medium for FP2. For FP3, my driver confidence is typically 100% or near it, so I just run 1 lap on the set of tires I won’t use for the race to avoid losing too many Softs before qualifying/race. If I need more laps, I’ll burn the tire I won’t use in the race until my drivers complete their goals.
So I usually do 1 lap for FP3 on Mediums and call it a day… Or nothing at all if I want to save an extra set of Mediums. That way, I’ll return a fresh set of Softs, but I wouldn’t have used it anyway. And on rainy FP and sunny race days, I run one lap on various dry tires to avoid losing all the Softs. So it’s usually an out lap straight to the pits on Mediums, sometimes on Hards.
TLDR:
Rule of thumb is to have a list of what you want for the race and qualifying, have 1 Soft and Medium as spares for the race if possible, and burn the others in Free Practice.
At what % to switch out engine, gear box etc?
I use one component each for the first two weekends and FP1-3 in Australia. After that, I switch to engine 2, ERS 2, and gearbox 2 for qualifying and races. I don’t move engine and gearbox 2 to FP sessions until engine and gearbox 1 are in the orange. By doing this, especially with a Mercedes engine, I can generally make it through an entire season with only (sometimes) having to buy one new ERS per car. This is really useful on the off chance that the sporting regulations change to require three engines instead of four.
Be the first to comment