Helpful Things for New Players
By Trash ♛ Panda.
These strategies do not yield overnight results – time, patience and discipline are required.
Quick Tips
Save cash!
Save cash to build during board events for better results. Keep friends under 30 for loss mitigation.
Only build with enough cash for 15+ boards
Board estimate = cheapest landmark ($) × 112. Costs increase exponentially; high net worth players may benefit from waiting for a cost reduction.
Only build during overlapping board events
Board Events: (1) Landmark Rush; (2) Board Rush; (3) Builder’s Bash; (4) Wheel Boost. Builder’s Bash is most beneficial for high-net worth players.
Repair landmarks to complete Quick Wins
Build two landmarks and allow them to get hit. Repairs conserve capital, restrict needless building and count as Quick Wins upgrades.
Only play during flash events, if possible
Wait for overlapping flash events or create overlap conditions.
Increase multiplier when roll odds are good.
Only increase your roll multiplier when roll odds are favorable. Use 1X when roll odds are bad or to create more advantageous board positioning. Do NOT use autoroll except during Quick Wins or to clear final board after building.
Do NOT risk more than 2% of dice on one roll
Do NOT use a multiplier that exceeds 2% of your total dice. 2% is best for risk management.
- Example: If you have 1,000 dice, 2% risk is 20X.
- 100 (20 ÷ 1,000) = 100 × 0.02 = 2.00%
General Tips
Only build during a Wheel Boost event
If you’re really low, be patient and wait for the Wheel Boost to overlap flash events like Landmark Rush and Sticker Boom. Yes, you’ll lose $$ in heists when you save this way but it’s entirely worth it.
Only play during flash events that optimize your game
Preferably of a combination of events.
Increase roll multiplier when your target tile range has good goods of a favorable or neutral landing
e.g. Railroad, or another important tile for an event like chance.
For example, Free Parking (2X Dice) Tax/Utility event running concurrently with a High Roller event or reward is a good time to put your multiplier to work when quality tiles are lined up.
6-7-8 is used for this but I prefer the total sum of odds. 6-7-8 works best for me on Corners milestone events, but I typically sit those out because my Corners personal performance is quite poor.
Complete sticker sets
Look for quality trades in reputable Monopoly Go! community trade channels.
Having an alt helps
You can trade stickers to your main or do big trades with people when a max of 5 per day doesn’t cut it and plus send yourself stars from the alt for the pink vault.
Only save for gold vault
The others are a complete waste. When saving for pink vaults, try not to open them until you have all stickers that are able to be traded without Golden Blitz event.
Demolish those boards!
If you land on a Railroad with a 1X multiplier start knocking down one person’s shields; once you’ve knocked all shields down you can crank up the multiplier and get the most out ot a shutdown.
Some will hate me for saying it but it works. Be ruthless… just try to avoid attacking people you trade with.
Terms & Abbreviations
Events
- Flash Events aka Limited-Time Events, Timed Events.
- Milestone Events aka Main Event, Top Event, Banner Event.
- Special Events and Mini-Games aka Peg-E, Hidden Treasures, Partners, Team Racers.
Common Abbreviations
Flash Events
- BB – Builders Bash.
- BR – Board Rush.
- CB – Cash Boost.
- CG – Cash Grab.
- FP – Free Parking.
- FPC – Free Parking (Cash).
- FPD – Free Parking (Dice).
- GB – Golden Blitz.
- HR – High Roller.
- LC – Lucky Chance.
- LR – Landmark Rush.
- MH – Mega Heist.
- RF – Rent Frenzy.
- RM – Roll Match.
- SB – Sticker Boom.
- WB – Wheel Boost.
Game & Board
- CC – Community Chest.
- RR – Railroad.
- RT – Rent Tile.
- WW – Waterworks.
- 2d6 – Two 6-sided dice.
- NW – Net Worth.
- QW – Quick Wins.
Optimizing Wheel Boost
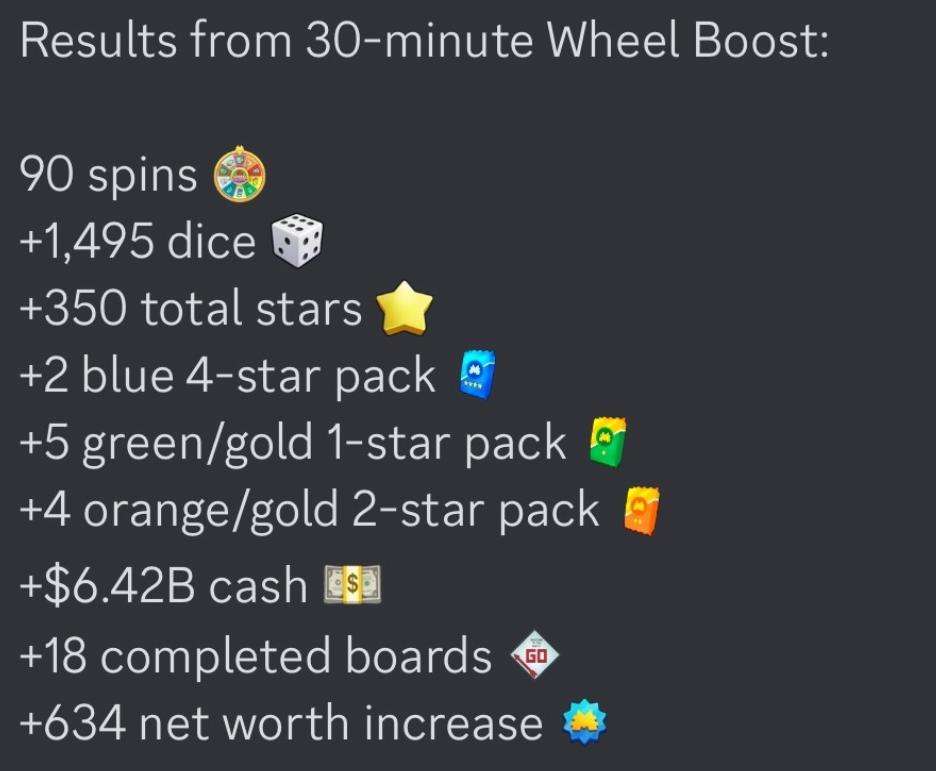
This strategy is the fastest, most effective way to build a dice foundation.
Save, Save, Save
What You Need
To use this strategy effectively, you need enough capital ($) to build a minimum of ten boards—preferably 15 to 20.
Estimating Board Costs
To estimate the cost of 10 boards, I multiply the board cost by 15 to account for the cost progression. This multiplier merely provides a buffer for the exponential price increases.
Mitigating Bankruptcy Risk
There is no way to avoid heists; if friends don’t rob you, then bots will. Currently, players on your Friends list are likely to rob you for larger sums than bots.
Steps to help mitigate losses from heists:
- Keep Friends list under 30
- Remove any friend who heists 1% or more of your capital per day
Wheel Boost
Wheel Boost events give you a bonus spin on the Color Wheel for each property set. The Color Wheel is activated by building houses in excess of the maximum board capacity, once all properties have a hotel, or by landing on a complete property set.
Blank boards reach maximum capacity after building 110 houses (22 hotels)—totaling 3 ⅔ boards.
Rush Events
Players receive a reward of 50 dice upon completing each board. You can gain an additional 60% or 100% more dice per board by building when a Rush event is active.
Landmark Rush
Players receive a reward of 10 dice upon completing one landmark. Completing all five landmarks per board yields 50 dice—100 dice per board.
Board Rush
Players receive an additional 30 dice for one board completion—80 dice per board.
Combining Events
Wheel Boost + Landmark Rush
Building 10 boards, while Wheel Boost and Landmark Rush are both active, yields ≈28 wheel spins and 1,000 dice. You can win an additional 15 to 75 dice per wheel spin.
The Trifecta
The best conditions in which to build, to date, are while Wheel Boost, Landmark Rush and Sticker Boom events are all active simultaneously—the “Trifecta”.
The Trifecta yields two spins per Color Wheel, 50%+ additional stickers per sticker pack and at least 100 dice per board. Building 15+ boards in a 30-minute time span during the Trifecta can result in returns of 2,000 to 3,000+ dice and 150 to 300+ stars. This can also jump-start a new album and expedite filling sticker sets.
Wheel Boost Example
The post below shows how I optimize time during a Wheel Boost event. The Wheel Boost event in the attached video clip was stand-alone, and did not overlap a Rush event or Sticker Boom. However, if it had then I would have yielded 30-50 additional dice per board and/or 50% more stickers from each pack.
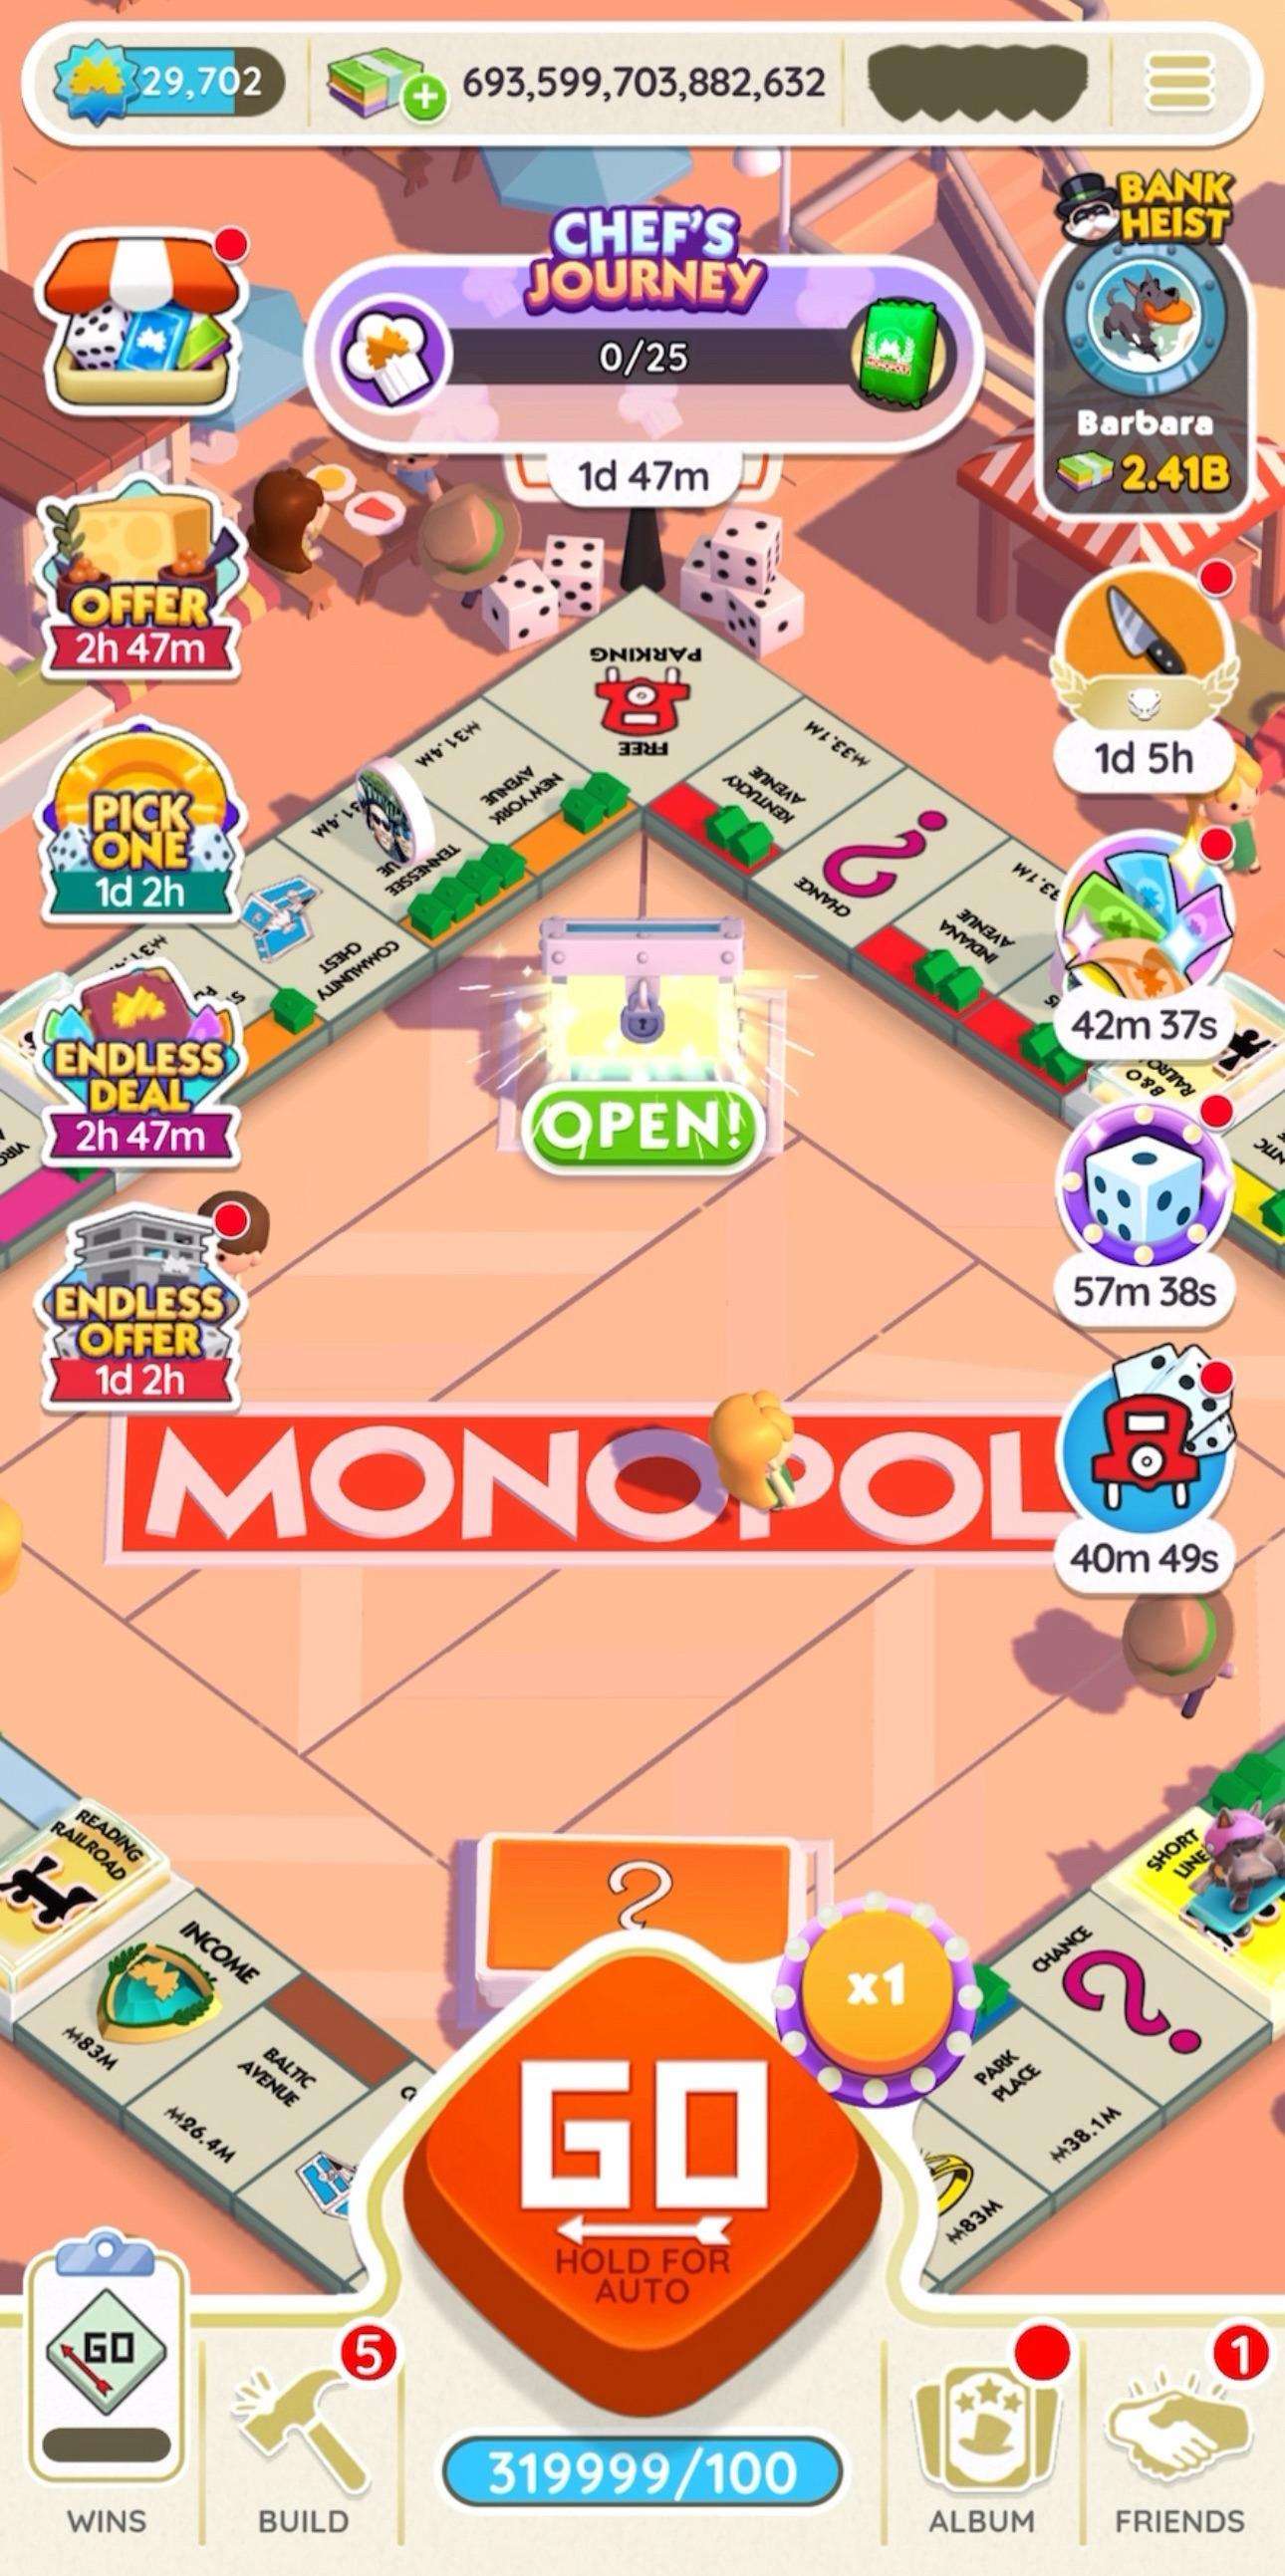
Clip of what I mean when I say i increase multiplier when I have quality tiles lined up…
The important tiles in this clip are:
- Railroad (+5 milestone event & tournament)
- Community Chest (+3 milestone event)
- Chance (+2 milestone event)
- Tax (free parking 2X dice)
- Utility (free parking 2X dice)
- Shields (returns dice if all shields are up)
You’ll notice that the 100X multiplier is used when there is a cluster of these tiles in a row. Best area of the board for this specific setup is around the “GO” corner.
Estimating Board Costs
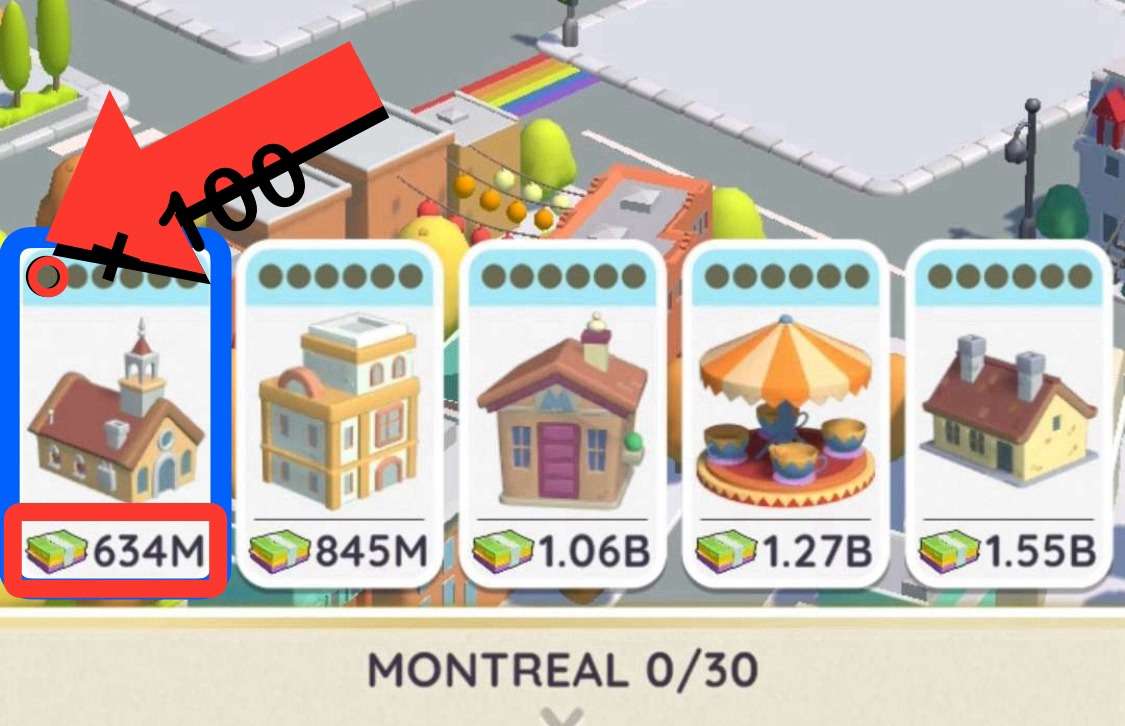
You can calculate a rough estimate of the cost of your board by multiplying the first build (bottom-left) by 112.
In this example, the very first build on this board is $634M.
- $634,000,000 × 112 = $71B
This is an approximation, give or take a couple decimals, but it should give you a general idea of how much capital ($) you need to build a board, start to finish.
Now, if we look at the capital ($) person has—$3.5T (or $3,546B)— we can get some idea of the minimum amount of boards we’ll be able to build at one time.
This person has enough capital to build at least 15-20 boards. 15-20 boards is around how much you’ll be able to build during a 30-minute Wheel Boost event if you optimize the time efficiently.

Using Roll Multipliers
The video clip illustrates effective increase of the roll multiplier when quality tiles create a favorable setup.
Important tiles in the video clip:
- RAILROAD → +5 main event & tournament
- COMMUNITY CHEST → +3 main event
- CHANCE → +2 main event
- TAX → Free Parking – Dice 2X
- UTILITY → Free Parking – Dice 2X
- SHIELD → Returns dice; neutral tile
You’ll notice that the 100X multiplier is used when “clusters” of quality tiles appear in the roll range.
Clusters
What is a “Cluster”?
Clusters are groups of tiles, bunched together, that are favorable and neutral to your game. Your “roll range” is the range of tiles that are 2 to 12 tiles from your position. Rolling into clusters increases the probability of landing on good tiles, or neutral tiles that return and conserve dice; e.g. a shields are neutral tiles that return the dice spent on that roll.
Example of a Cluster
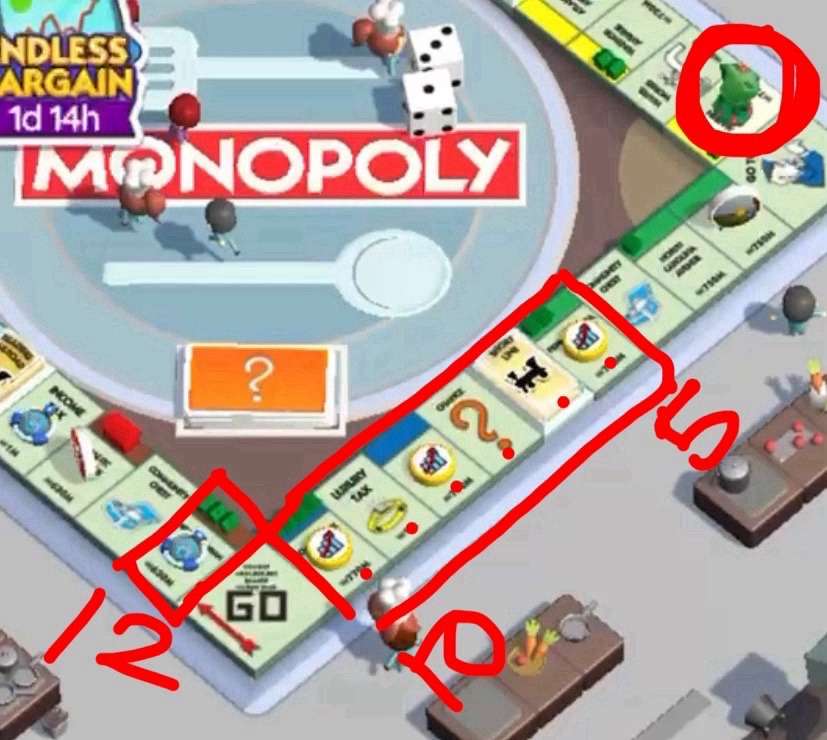
The image below shows one roll range—tiles 2–12 from the token position.
- RED tiles (5, 9 and 12) are UNFAVORABLE; I DO NOT want to land here.
- GREEN, BLUE and ORANGE tiles (2, 3, 4, 6, 8 and 10) are FAVORABLE; I DO want to land here.
- YELLOW tiles are NEUTRAL tiles (7 and 11). Neutral tiles do not incur loss if I land on them; i.e. shields will return the dice spent—acting as a cushion.
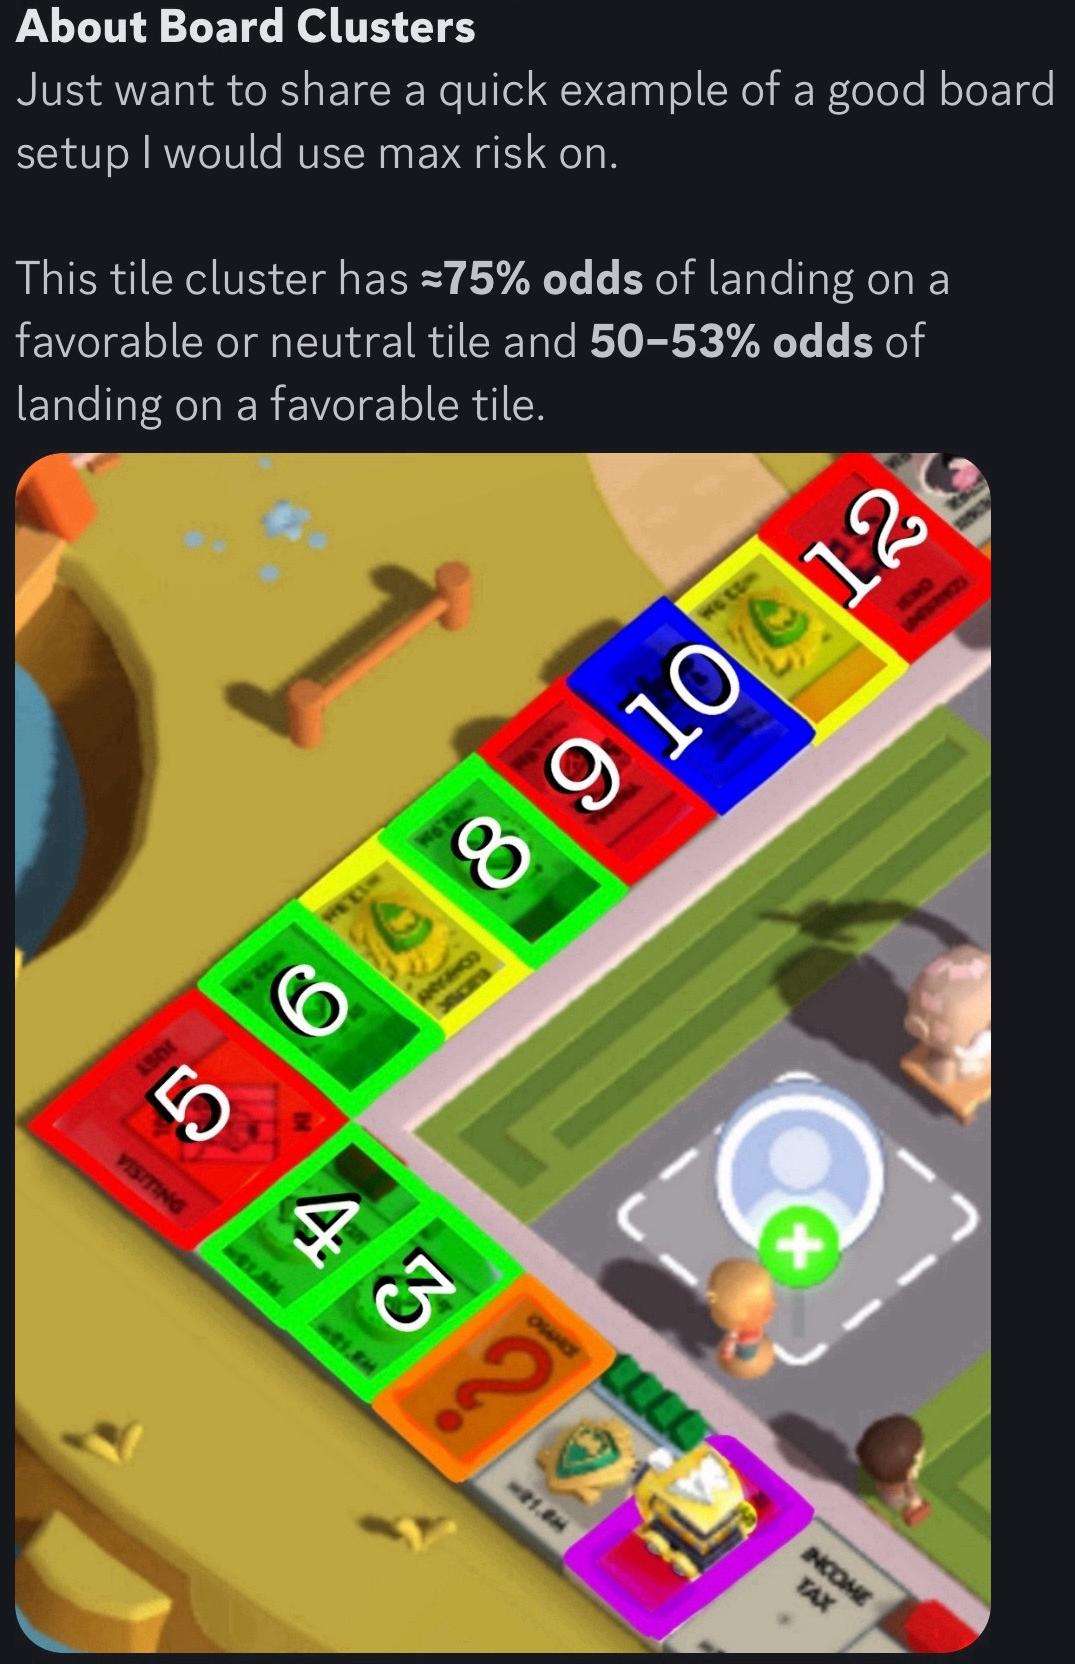
The above is a cluster, as you can see that favorable and neutral tiles are clumped, or “clustered”, together in your roll range—making the odds of wasting dice minimal.
Clustering is a concept that will help you eyeball roll odds effectively if you’re not using precise math; this is a more relaxed way of playing.
Your multiplier determines the size of your bet.
- Increase your ‘bet’ when the odds DO favor the desired outcome;
- Decrease your bet when the odds DO NOT favor the desired outcome;
- Increase bet → Increase amount of dice you risk on the roll = increase multiplier;
- Decrease → Decrease amount of dice you risk on the roll = decrease multiplier.
More Cluster Examples
Example A
In this example, my favorable tiles are puzzle pieces (partner event), RR and Chance for side tournament, and tax/utility tiles for top event; neutral tiles are shields.
In this picture, I have over 90% chance of landing on a favorable or neutral tile. You can sum the time probabilities using the roll probability sheet.
Circle Color Key:
- YELLOW → Shields (neutral)
- GREEN → Puzzle pieces (partner event)
- BLUE → Utility (main event)
- PINK → RR or Rent Frenzy
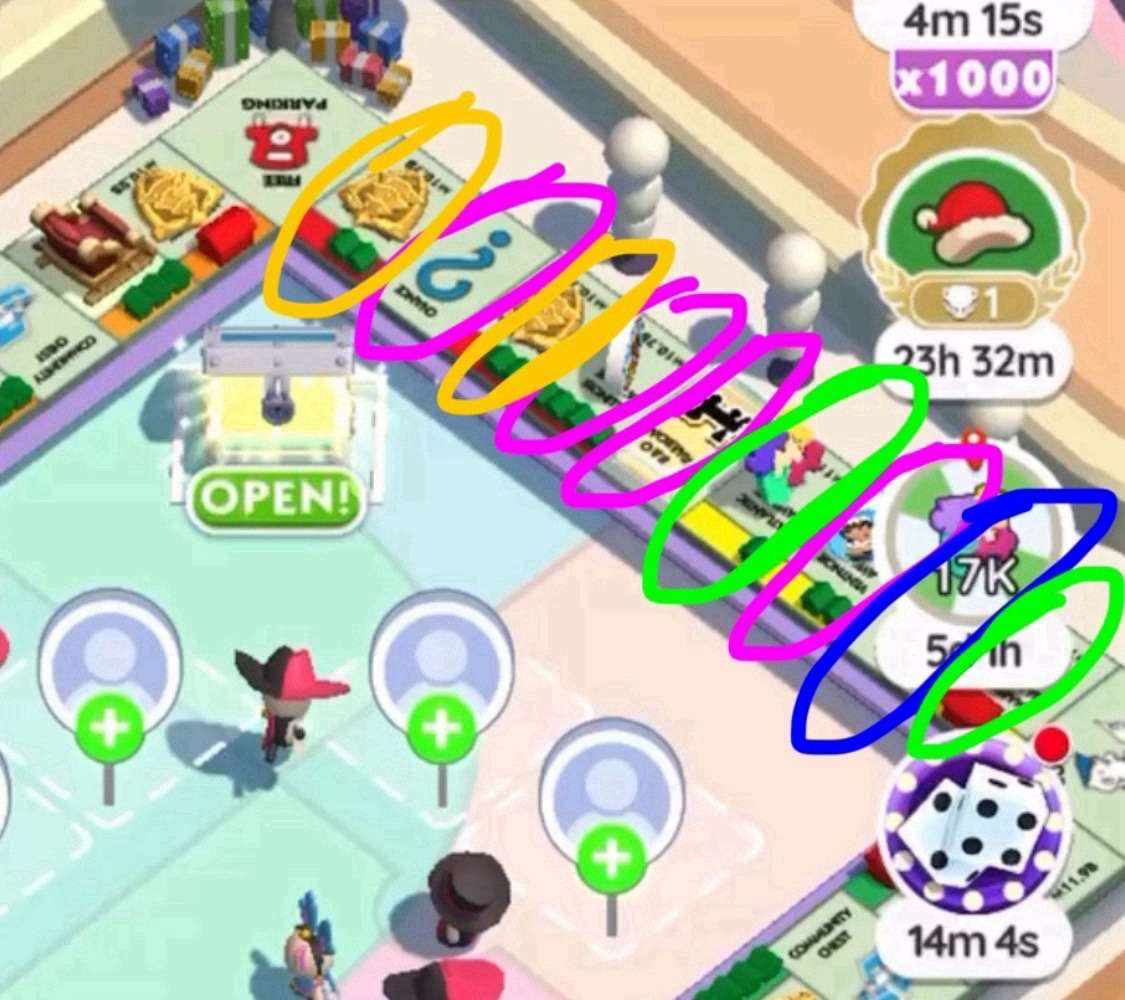
The circled tiles are either favorable or neutral to me—given my individual circumstances. The only unfavorable tiles are the Free Parking corner (rolling a 2) and the Jail corner, if jail doubles is not rolled.
This setup is optimal because the odds of landing on a favorable or neutral tile are over 90%—a great setup to increase the roll multiplier.
Example B
Example B shows an active Free Parking Dice 2X flash event during a Pickups main event.
Example C
The video clip in Example C is another illustration of increasing your multiplier when approaching an advantageous cluster.
Note: Example of event layering (right column).
Risk Management
Metrics below are my personal risk ratios. There is no right way to manage risk; there is, however, a wrong way.
Roll Probabilities and Risk
My Personal Risk Preferences
- Less than 44% probability: 1X risk
- 44% to 60%: 2% risk
- Over 60%: 5% risk
Max Multiplier for Dice Count
🎲 20k+ = 1,000X
🎲 9k to 20k = 500X
🎲 4k to 9k = 200X
🎲 > 4k = 100X
Absolute MAX risk should never be more than 5% of your total dice amount. It’s not a bad idea to use less than 5% risk; however, many here are less risk averse.
Personal Risk Management
Factors in Risk Management Choices:
- Personal risk tolerance
- Amount of dice you have
- Comfort level with strategy and setup
- Event performance history
- How quickly you can offset losses, etc.
Asses Event Payoff
It’s okay to sit out of events. For instance, I now forgo most Corner top events due to poor performance and negative expectancy (this will change from person to person). If you’re experiencing negative expectancy with certain events, do a post-mortem assessment and change what’s not working.
Layering Events & Rewards
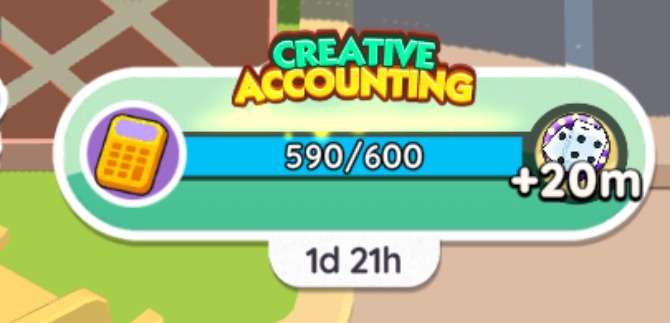
Get it to overlap other flash events… so for example I’ll get close to triggering the 5m cash boost reward you don’t like lol. Then I’ll wait and intentionally leave it.
Then say a new tournament starts during a free parking (2X dice) on tax/utility for 45minutes. I will crank up the roll multiplier so I can not only trigger the cash boost 5m but also get to the 5-minute high roller reward (that’s typically in the first 5-10 tournament rewards).
So in this example, hypothetically, we’ve triggered the 5m cash boost and the 5minute high roller during a milestone event where railroads, chance and community chest are all reward tiles and now we have a free parking 2X dice on tax/utility tiles for 45minutes.
We can turn up that multiplier bigly and our probability for getting high quality rolls increases exponentially. And you get double the cash too.
If you look using wheel boosts the way I do then 2X cash is fantastic. Here is a picture example of lining up an event reward to optimize. I wait to trigger certain rewards until they overlap a flash event that I can use to optimize rolls.
Event Rollover Strategy
This Rollover strategy can be applied to Partners events and Team Racers events.
Rollover Partner Vault Rewards
You can use the event vault rewards from completed Partner towers in future events/gameplay by rolling the vaults over once the Partners Event has concluded.
How to Rollover Vault Rewards
Important! This only works if you do not open the completed tower(s) before the partners event ends.
Once you’ve completed your partner towers, close or uninstall the app until you’re ready to activate the vault rewards. With the help of your partners, you can use any of the following methods:
Full Carry Trade
- Trade STICKERS to your partner in exchange for a Full Carry. Remember—monetary exchanges are prohibited and can get you banned.
Full Carry Gift
- A generous partner gifts you a free Full Carry or you win a Full Carry giveaway.
50/50..Your half FIRST
- This requires building your half of the partner tower FIRST so that you don’t activate the vaults with limited-time event rewards; e.g. High Roller, Cash Boost, Lucky Chance, Sticker Boom, etc.
50/50 via Full Carry from each partner
- This method requires at least one partner to have an alt account. You and your partner agree to 50/50 by completing two towers together.
Example: Your partner has an alt; you go 50/50 on points (80k each)—versus one tower (40k each). Your partner agrees to carry one of your towers and while you carry your partner’s alt.
Why This Strategy is Helpful
This strategy helps to optimize the partner vault rewards by implementing them more effectively to your game.
Examples of Vault Rewards:
High Roller — 120 minutes total
- This amount of HR is never needed to complete the event—even when applying appropriate risk management.
- HR is best utilized during Free Parking Dice 2X for net gain opportunities.
Cash Boost — 40 to 60 minutes total
- If you’re prioritizing cash for board building purposes, Cash Boost is a great resource.
- You can more generate higher yields by pairing Cash Boost with other cash-supportive events; i.e. Mega Heist, Rent Frenzy, Free Parking, etc.
Sticker Boom — 10 to 40 minutes total
- If Partner Event vaults include Sticker Boom, this is a great resource to utilize during board boosting events—Wheel Boost, Landmark Rush, Builders Bash and/or Board Rush.
- You may be able create a Trifecta by activating Sticker Boom rewards during events combos like Wheel Boost + Landmark Rush, Landmark Rush + Builders Bash, etc.
- If the opportunity presents itself, you can first use the Sticker Boom with a Wheel Boost combination (typically 20-30 minutes). Then apply the remaining SB and HR time to the commencement of a new Milestone event and Tournament for optimal use.
Optimizing Shields & Pickups
Important: This strategy is NOT for players that do not have enough dice to toss into auto-rolls.
This write-up will walk through the process of optimizing Shield and Pickup placements around your board ranging from beginner-level, intermediate-level, to advanced-level steps. Be sure to stop at the strategy level that you’re most comfortable with as it will become increasingly complex and dice-costly to set up. At the most advanced level, you’ll be able to force Pickups to likely spawn within your desired rows and safely attempt Jail tile spams while having every surrounding Shield and Pickup respawn at the same tile more frequently than before by utilizing Rent Frenzy to congest/lock the board until the buff runs out. So let’s begin starting with the basics.
Entry-Level: Rearranging Shield Locations
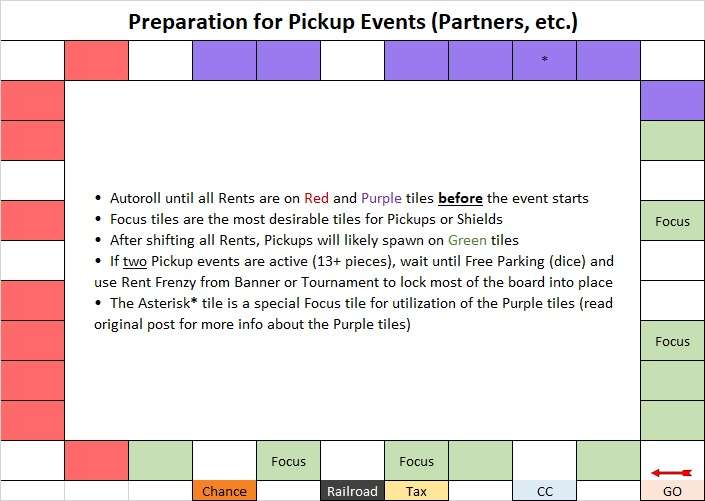
Firstly, we’ll want to set up our Shields either before the next Tournament, Partner, or Banner event (aka Main event or Top event). While we can’t know for certain which Banner event will come after one ends, we do know that as of today, there are four optimal Shield locations that are applicable to EVERY Banner event if the focus is to obtain Tournament points along the way. These are labeled as “Focus” tiles on the board reference image below.
You’ll want at least one of your Shields on these Focus tiles prior to the next event refresh. This is achieved by auto-rolling until your Shield spawns to your desired tile. Each properly placed Shield can increase your safety probability by over 10%. This is the fundamental method for preparing your board for the next event.
Intermediate-Level: Forcing Pickup Spawn Locations
This is where we’ll go through how you can drastically increase the chances of Pickups from events such as Partner events and/or Pickup Banners to spawn at your two desired rows on the board. Partner events are often announced ahead of time, so it would be simple to prepare for this type of Pickup event. You will need to use the image above labeled “Preparation for Pickup Events” as reference for this segment.
Prior to the next Pickup event, you’ll want to auto-roll until you’ve moved most (preferably all) of your Rents to the Red and Purple tiles. You’ll want all the respawn-able pieces to be all over your two desired rows. It does not have to be perfect. But if you do want perfection, it may take half an hour to an hour of auto-rolling to accomplish. Be mindful of the dice cost for this much auto-rolling.
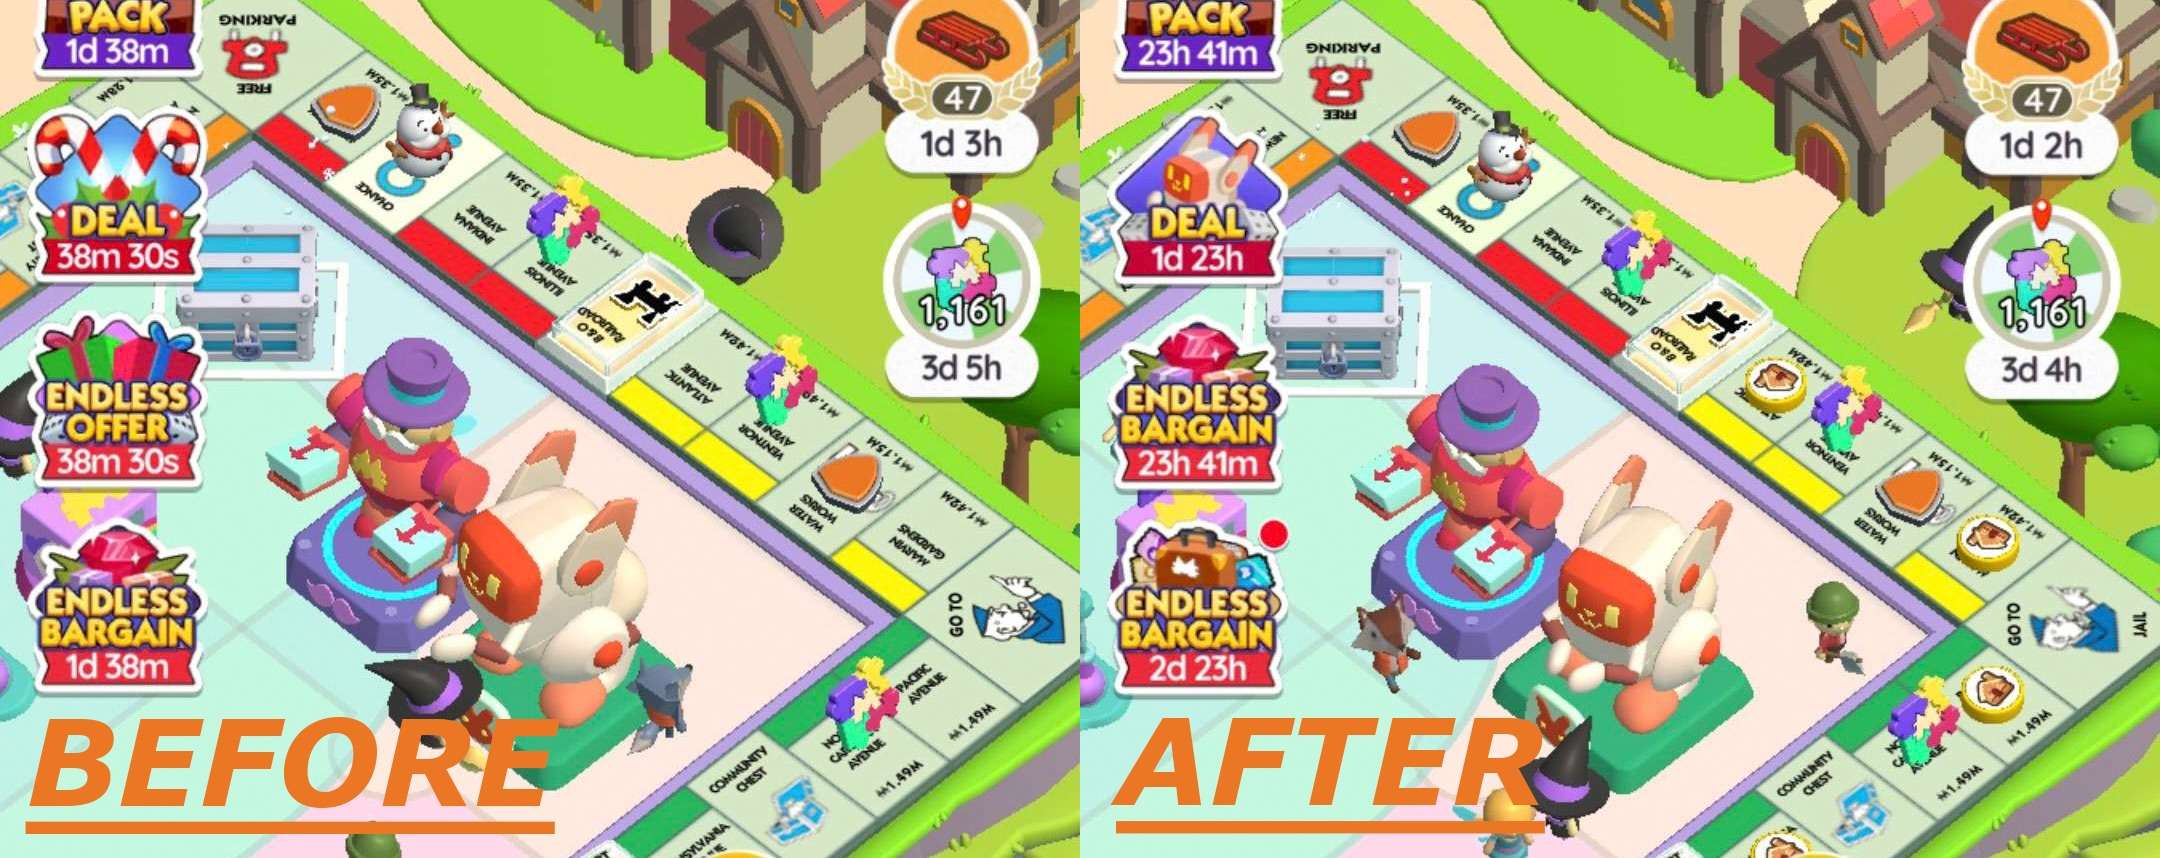
Once you’ve moved all the unwanted pieces (Rents) to the Red and Purple tiles, the odds of Pickups from the Partner event spawning on your two cleared/desired rows will be high. Usually, there is a new Banner event that comes on the same day after the Partner event begins. Do not roll until the next Banner comes. If it happens to be a Pickup Banner, your two desired rows will now be filled with Pickups from both the Partner and Banner events with little-to-no gaps in between!
For an example of this, view the Before/After screenshot below.
Advanced-Level: Locking Your Pickup Row(s) Into Place
Required: Minimum of 13 Pickups (ex: Partner and Pickup Banner events both active), 4 Rents, Rent Frenzy buff available
We’ll be going over how to gridlock your board so that your Pickups are very likely to stay on your primary row. There is a total of 26 tiles on the board where Pickups/Shields can spawn. With a Partner event and Pickup Banner active, you’ll have 21 tiles occupied from Partners event (5), Banner event (8), Shield (4), and Rent (4).
We will be utilizing Rent Frenzy to gridlock our board, bringing the total of occupied tiles to 23/26! This means that there will only be THREE other tiles where pieces can be shifted to. With this type of gridlocked board, your primary row should easily be maintained throughout the duration of the Rent Frenzy buff! This is the one time that Rent Frenzy becomes overwhelmingly powerful.
Ideally, you’ll want your secondary row to come immediately after your primary row. The secondary desired row acts as a buffer to your first desired row. This way if a Pickup or Shield moves away from your primary row, you’ll immediate have a chance to respawn a Pickup/Shield back to that spot using your secondary row. If your secondary row is on the GO tile, you can utilize board clears to reposition yourself for additional attempts.
You’ll activate Rent Frenzy from the banner and then High Roller from the Tournament during Free Parking (dice). You’ll be able to keep rolling with the same or similar Pickups layout until the Rent Frenzy buff runs out.
But be mindful that as slim of a chance as it may be, it is still possible for your desired rows to be rearranged to have multiple rents during Rent Frenzy. If this occurs, STOP rolling immediately. When Rent Frenzy is active with a bad layout during gridlock, it will be incredibly difficult to fix and should not be attempted. Consider it a double-edged sword.
Advanced-Level: Spam-Rolling the Jail Tile
With all that said, a personal favorite of utilizing this strategy is for attempts at spamming the Jail tile. The Purple row (reference image) and the next following row are the two desirable rows when you want to spam the Jail tile for dice-building. Ideally, you’ll want most of the Banner pickups to spawn on these two rows. This means that the best time to rearrange your board would be AFTER the Partner event starts but before the new banner. This allows you to move the Partner pickups away from these rows. In this scenario, Free Parking (dice) on corners and tax/utility are both practical but the latter is preferred.
Notice that when Free Parking (dice) corners is active and all the possible tiles leading up to and after the Jail tile are filled with Pickups and Shields, this creates a 100% probability of landing on a desirable target.
Also keep in mind that once you finish the last milestone of either the Banner, Tournament, or Partner event, the benefit of continued rolling drastically changes. With a gridlocked board, this type of completion can happen very quickly.
Closing Notes:
- Moving the Rents before any Pickup event begins will save you a lot more dice. This is because Rents will always move to a new tile upon landing while Pickups and Shields can respawn on the same tile.
- It’s important to create TWO desired rows instead of one since the second row acts as a buffer for your primary row. If a Pickup from your primary row moves to another tile, then landing on a Pickup on your secondary row may move a Pickup back to that tile. You’ll want your secondary row to come immediately after your primary row.
- There is often a Rent Frenzy within the first few milestones of a banner. Be careful about when to activate this buff if your intention is to gridlock the board.
Treasures Board Levels
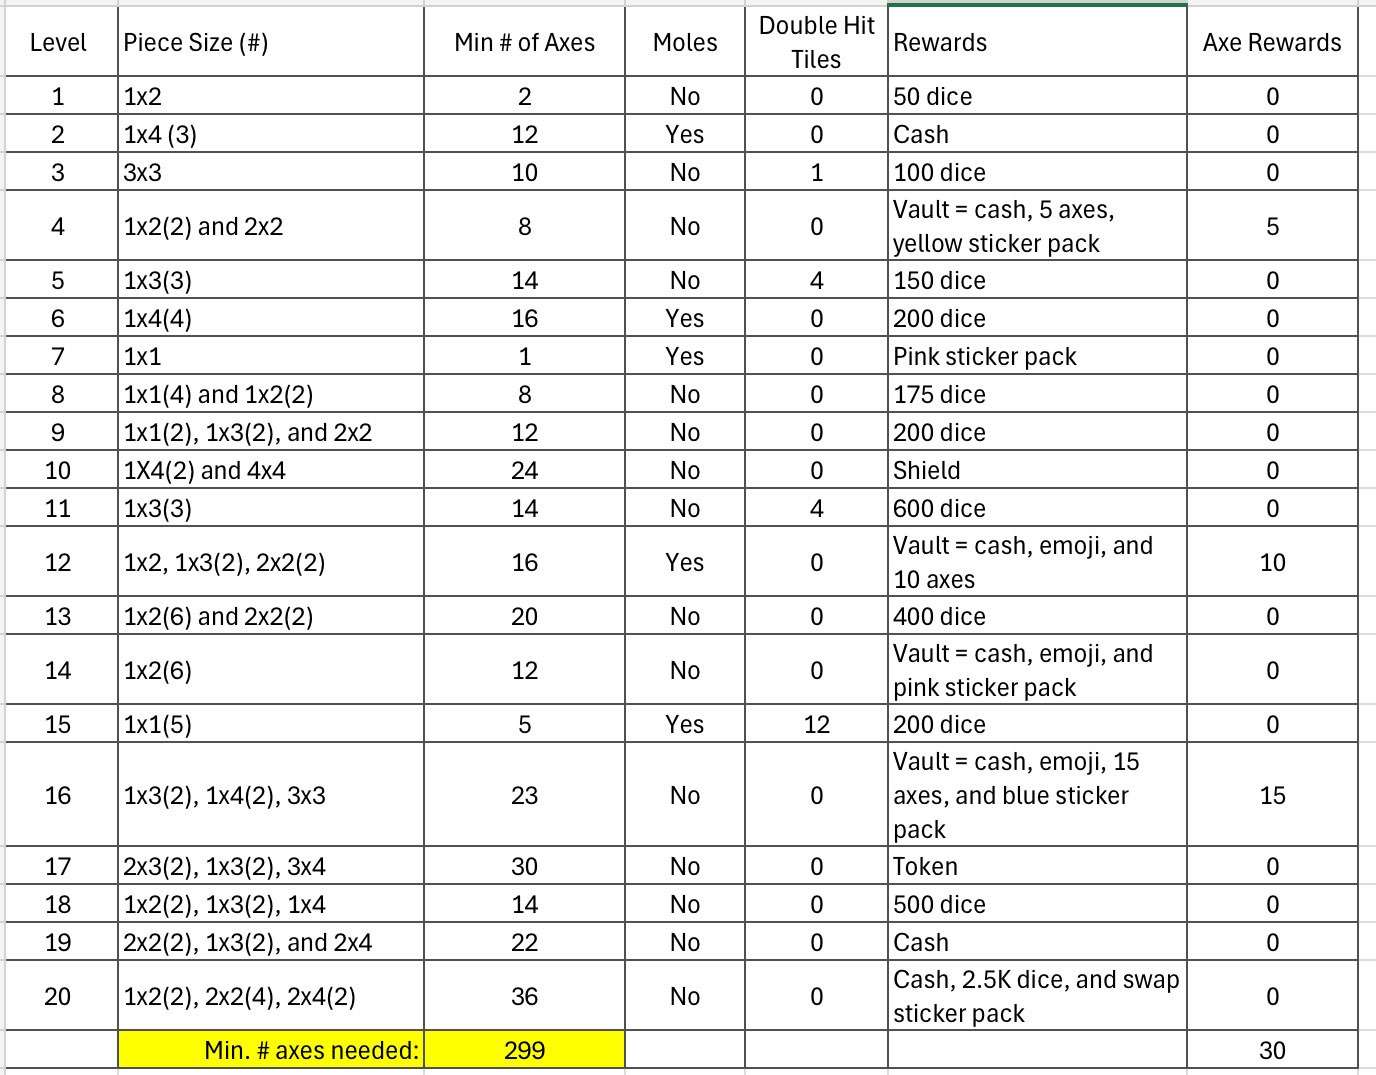
Рere’s the new year’s treasures board levels, minimum axes needed, whether there are moles and double hit pieces, and the rewards. The minimum axes needed does not account for moles, however, the double hit tiles are included in the min axes for levels 3, 5, and 11 (but not level 15).
Click to enlarge…
How to Get Free Dice
For new people asking how to get free dice without spending money: No matter how much dice you have – even if you were miraculously gifted 100k 🎲 – you’d still end up right back at zero if you’re not playing strategically. This absolutely guaranteed.
You can collect an average of ≈325 🎲 per day for free (≈2.3k/week) – gaining almost 40% more than the 10k 🎲 album reward from doing absolutely nothing.
Free Dice Sources:
- Daily Treats gifts 275/week
- Quick Wins tasks 257.5/week
- Free Gifts (8hrs) ≈500/week
- Free dice links ≈250/week
- Sidebar freebies ≈20/week
- Tycöon Club gift ≈314/week
- Tycöon Club spin ≈50–75/week
- Daily Treats gifts ≈58.3/week
- QW emoji shelves ≈43.7/week
Estimates don’t even include collateral event gains, CC friend gifts or sticker sets without golds. You can finish these sets without spending dice – you just need to hustle in trade and donations channels.


Be the first to comment