Useful Tips for New Players
By Hydrosofista.
Check every corner, and make sure you only engage when you have truly scoped out a situation. Don’t reload until you are sure it is safe to do so.
Bandits (2-5) / Wolves (3-5) / Boars (2-3) / Blinks (2-3) / Ghouls (3-4) / Spiders (2-5) usually travel in packs or groups. Know what you are engaging in before you engage. Bigs always are alone, so feel free to let it rip if you run into these guys.
Make sure your route to an ex-fil area is clear. The Green Circles are the ex-fil areas. Plan your route accordingly. You can put waypoints on the map to plan a raid. I usually do so right when I spawn into a map. Press “M” to bring up the Map, and right click to set a waypoint.
Overloading on gear or loot can slow you down. Sometimes it’s worth dropping that gun or armor suit just so you can safely extract and be able to run from that wolfpack. Especially on the higher difficulties. Being too greedy WILL get you killed.
Switching ammo type is achieved by pushing “Y” then selecting the ammo type you want to use for that weapon. You can see which ammo type works for each gun (when you click on the gun in your inventory, it will highlight the ammo types in your inventory that work for that weapon).
Boars are gonna mess you up. I have been playing this game since it was released, and even on the harder difficulties I get killed by Boars more often than any other creature or enemy. Deal with that frustration when it happens, and start another run or hunt. That’s the fun in this game.
The Airplane drop will nearly always give top tier loot, IF you hustle over there fast. Wait too long, and only bread and water will be there. It usually also brings 10-16 enemies who are in the vicinity that will try to kill you. Sadly, they don’t seem to have the airdrop loot, but still usually can carry decent enough gear to get over there fast.
If all the birdies fly across the screen – GET INDOORS FAST!! There is going to be a massive purple anomaly storm shortly (I think of that as a nuclear storm) and that will wipe out everyone on the map. If you have enough Rad Injectors and a decent enough rad resistant suit (like the SEVA suit) you can run around the map and loot everything to your heart’s content AFTER the detonation has happened. If there is no indoors to run to, get to the right side (or leeward) of some large object like a car or truck or big stone and hunker down and pray. A radioactive rain will rain for a few in-game hours after the storm.
The Networker is located in the Bunker, in the room across (down) from the Bar. He gives out daily quests you can finish for more loot or equipment. Don’t take on any quests for locations you haven’t unlocked yet. Networker quests reset at 7am daily. Make sure to visit if you completed some or all of the ones from the day before.
All traders in the Bunker are linked in regards for their bank. However, each can sell specialized loot. So if you spend all your money at the doctor, the Barman or Green/Crimson trader will have more money so you can sell them stuff. All traders currency and loot reset daily at 7am.
Doctor repairs armor, he is the only trader that can do that. Rest you need to repair via armor repair kits.
Sleeping resets radiation levels as well as fatigue. You don’t need bed module for this to work, sleep on any bed you find. I prefer the one near Crimson Corp trader.
Use repair kits or your workbench (if you have the workshop module installed) to repair your weapons. Low level condition causes weapons to jam more frequently. I strongly suggest never going hunting unless you have at least 80% weapon condition. There are two tiers of weapon repair kits, the big rectangular work boxes (looks like lunchboxes) and the smaller kits. Each color only works on the weapons that are in the caliber it says on the kit. Each weapon has its caliber listed, so its easy enough to repair guns. Note, you CAN bring or use weapon repair kits on a hunt. Same for Armor repair kits (useful for some of the harder maps or missions).
Burden Injectors are the best way to carry a lot of loot. Enter a map, loot up with good loot, take an injector, exfil. Rinse, repeat, it will solve all your money problems fast. A good run will get you a +six figure loot yield, and you can break down runs for essential supplies (medical/gun parts/scrap material etc) pretty easily.
Rad Injectors are a required item for any map besides the Forest map. This is because until you get the better armors with more effective rad defense, these maps pretty often will have radioactive rain. So instead of cooling your heels indoors for a few hours, pop an injector and loot on.
Do NOT try to raid early game at night. Try to save up for some decent NVG’s. I have come to learn how Level 1 and 2 operate and can raid pretty well with them. Some others find them difficult to operate, at least for the first few missions. Level 3 NVG’s are awesome, you become a night stalker pretty much and don’t have to raid in the daylight anymore. The flashlight mounted on your gun or head is pretty worthless, you have no peripheral vision so get the early glow all around headlamp if you insist on doing night raids without NVGs.
Which Tasks Unlock the New Locations?
- Forest – Unlocked at start
- Makeshift Camp – After “Towards Makeshift Camp”
- Industrial Area – After “Clear The Way”
- Swamp – After “Clear The Way”
- Mall – After “The Sewers”
The Final Assault Tips
For the first part peak the corners carefully and try to take long range shots. For the second part run to the left and hunker down in that room just holding down the lobby.
Third part god knows how just clear the platform, taking advantage of lights, use a long range weapon to clear BOTH ways and then switch between both sides taking pot shots until you are clear. Fourth part. The only hard part is the exit from there.
Try taking out the guys on the right by the wall without angering the ones below you. Then grenade the lower room and clear it with range, whilst using the wall to the left as cover.
The room below the entrance is a good way to progress further through the last part, that basically is just a corner peaking exercise.
A pretty detailed description on how to beat the last challenge of the game:
- I used maybe 6 to 7 stacks of ammo, 6 repair kits and some meds and injectors along the way.
- 4 injectors of healing, body fortifying and chow down are also good to pop before each section, making it easier.
- The 30 more health can save you in a pinch.
Gamepad Controls
Click to enlarge…

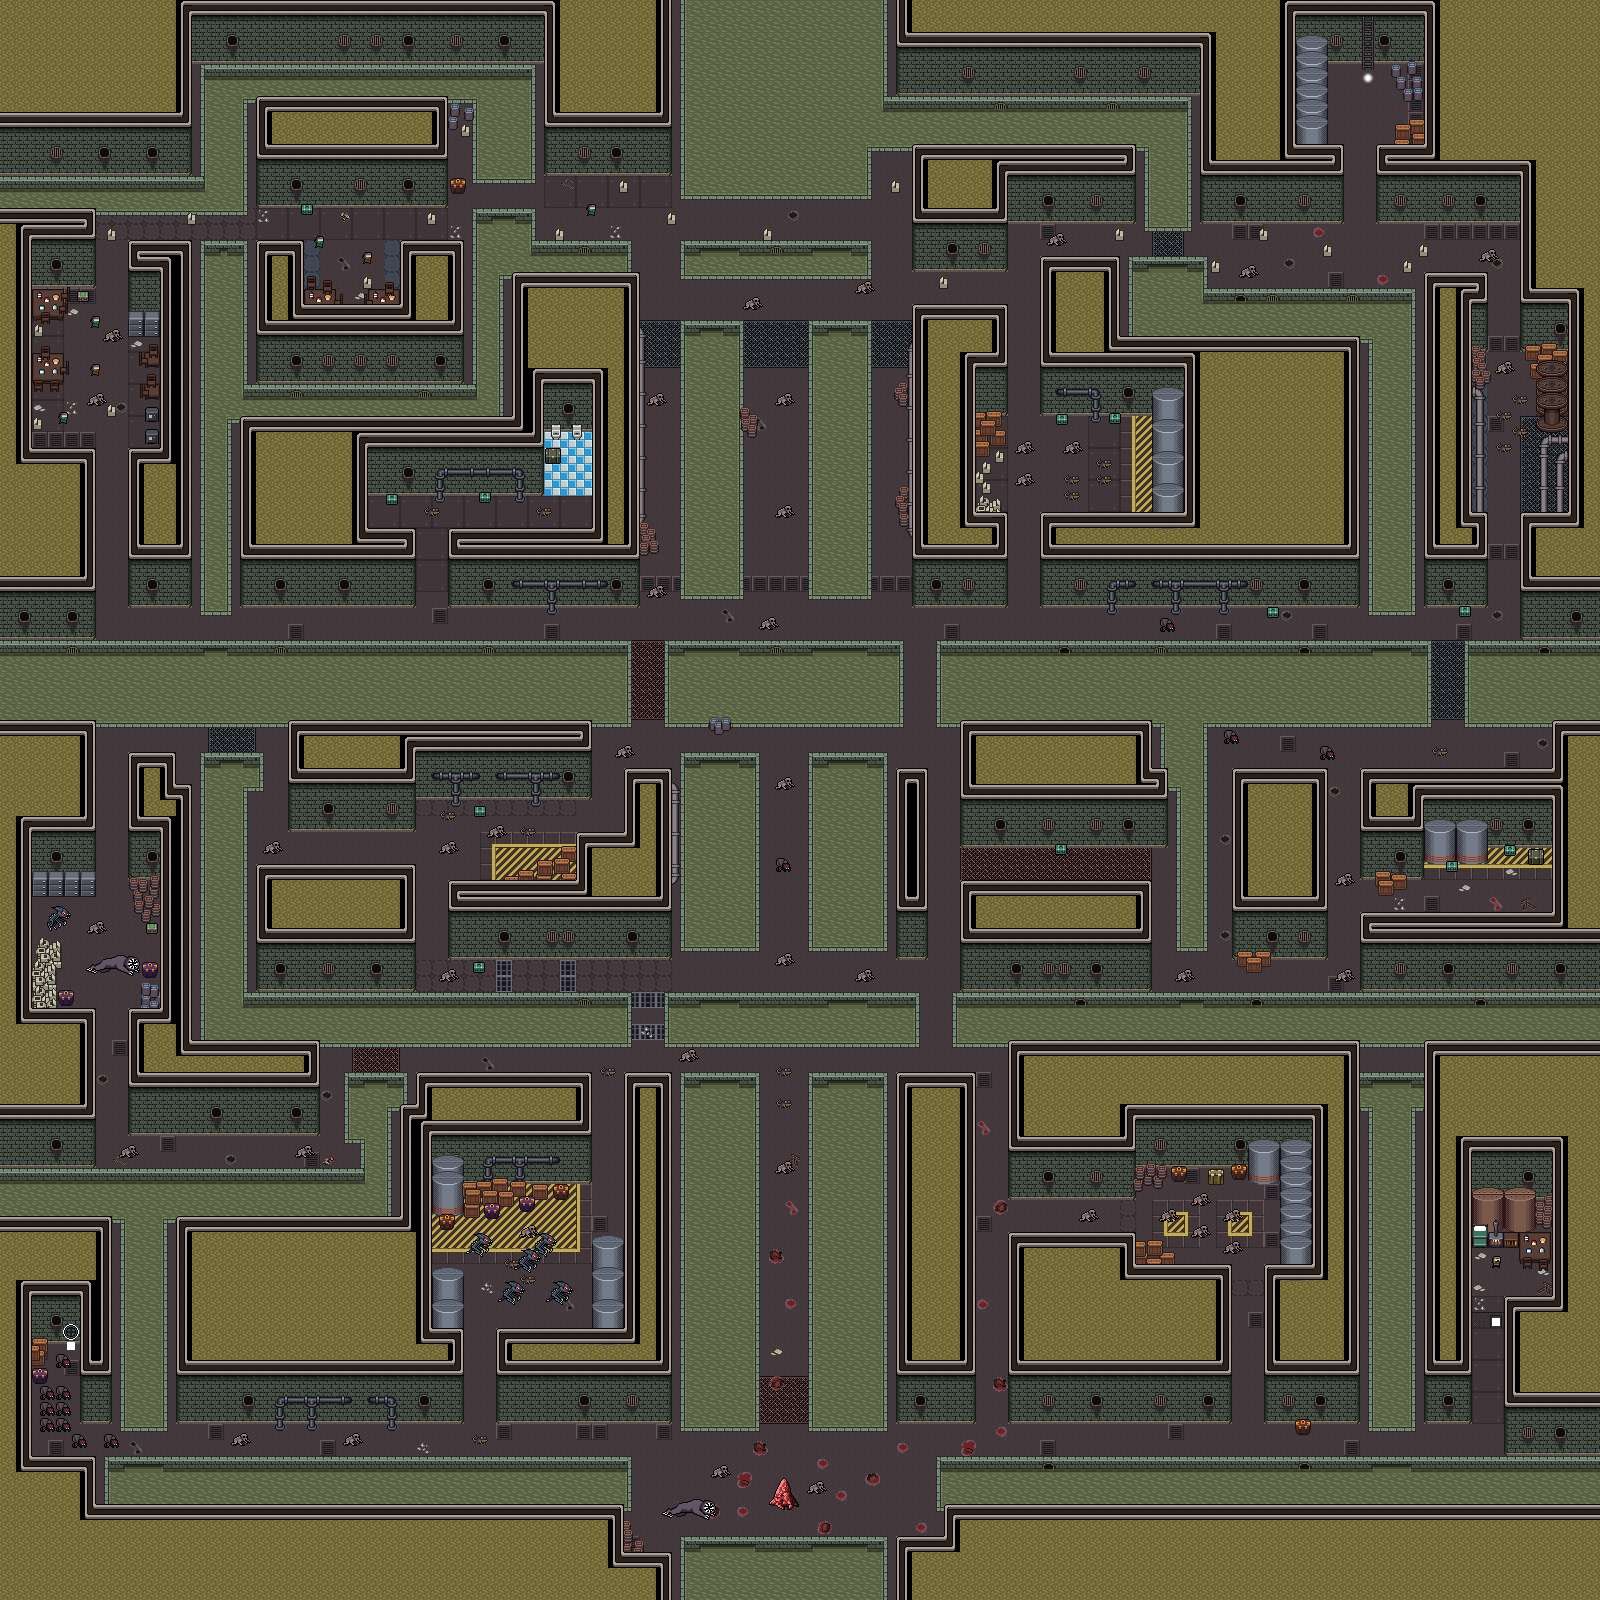
The Sewers Map
Click to enlarge…


Be the first to comment